
If your car’s window tint is bubbling, turning purple, or peeling at the edges, you already know it’s time for a change. But for many drivers, the real hesitation isn’t knowing how to remove car tint. It’s the fear of damaging the defroster lines on the rear windshield. Those thin orange strips running across your back glass are delicate, and once damaged, that section of the defroster simply stops working.
This guide covers everything you need to know about window tint removal: DIY methods, professional options, adhesive cleanup, defroster protection, and when to call a shop instead of going it alone. Whether you’re searching for how to remove tint from car windows, how to remove rear window tint without damaging defroster, or simply want to know the best way to remove window tint at home, this is your complete resource.
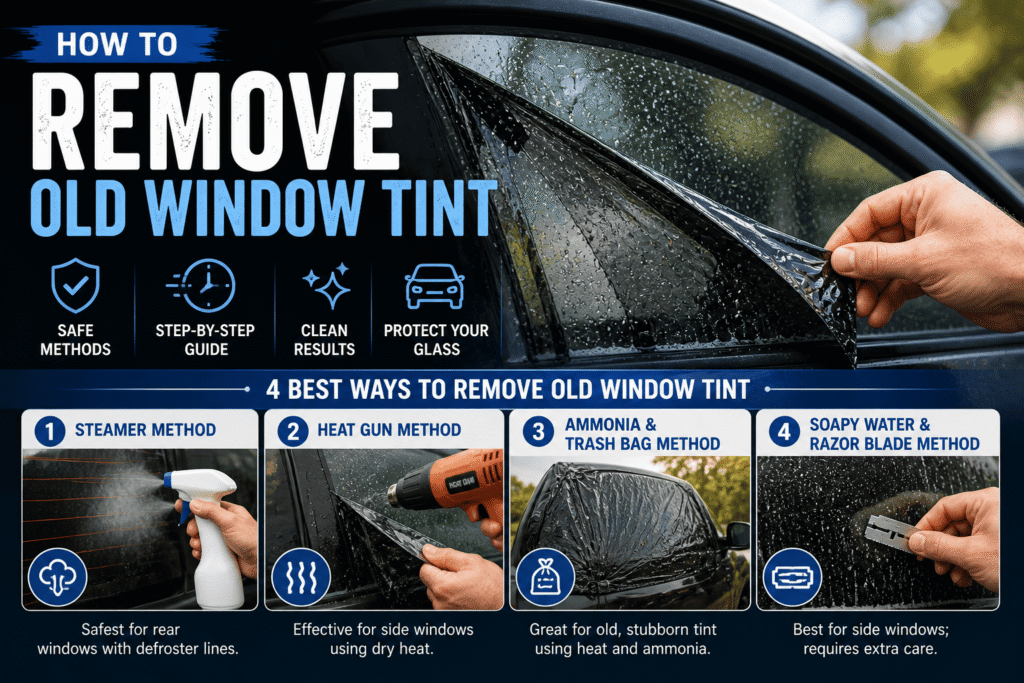
4 Methods to Safely Remove Old Window Tint
There is no single “best way to remove window tint” that works for every vehicle and every tint age. Here are the four most effective methods, from safest to most aggressive.
Method 1: Steamer Method (Removing old Window Tint with Steamer)
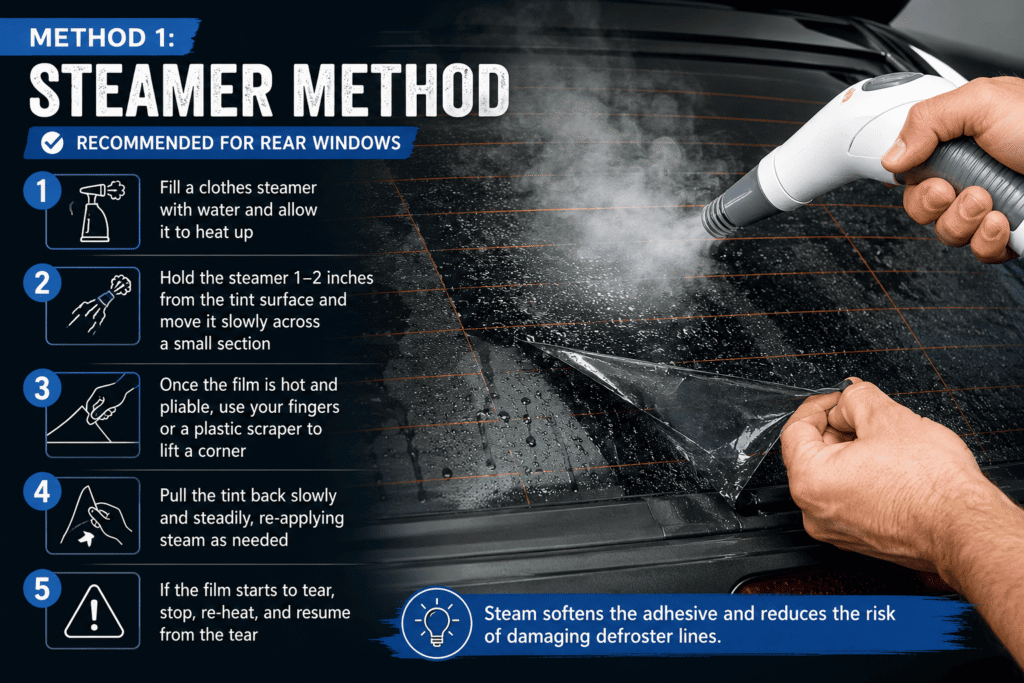
The steamer method is widely considered the safest approach for rear window tint removal, particularly because steam penetrates adhesive evenly and reduces the stress on defroster lines.
- Fill a clothes steamer with water and allow it to heat up
- Hold the steamer 1–2 inches from the tint surface and move it slowly across a small section
- Once the film is hot and pliable, use your fingers or a plastic scraper to lift a corner
- Pull the tint back slowly and steadily, re-applying steam as needed
- If the film starts to tear, stop, re-heat, and resume from the tear
Method 2: Heat Gun or Hair Dryer Method
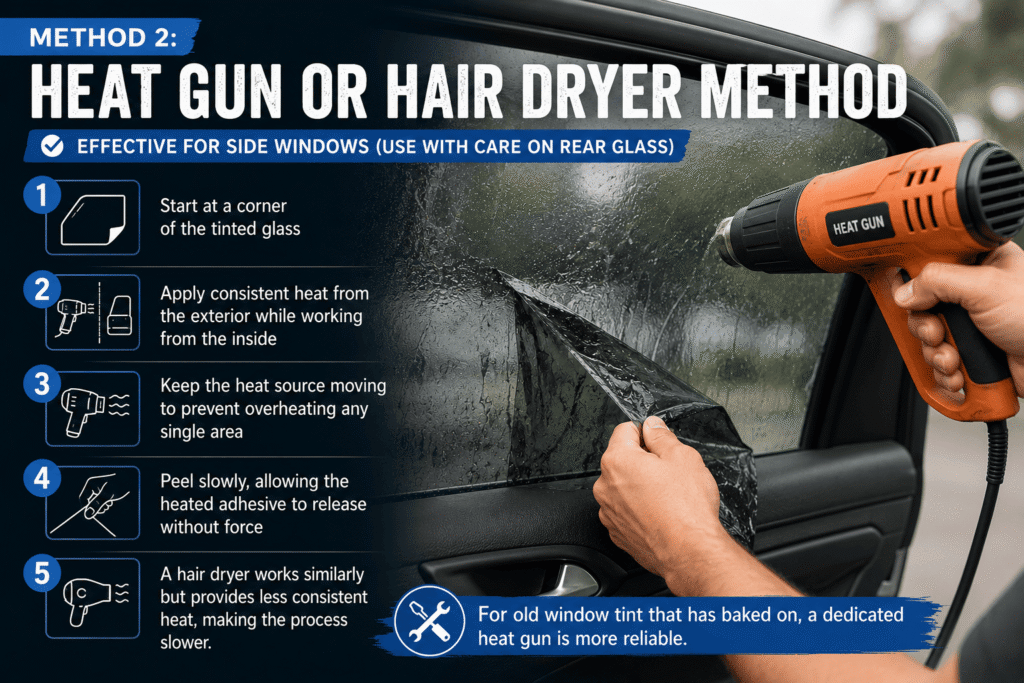
A heat gun is effective for side windows and can work on rear glass with care. Unlike a steamer, a heat gun applies dry heat, which works best when the film has not yet hardened significantly.
- Start at a corner of the tinted glass
- Apply consistent heat from the exterior while working from the inside
- Keep the heat source moving to prevent overheating any single area
- Peel slowly, allowing the heated adhesive to release without force
A hair dryer works similarly but provides less consistent heat, making the process slower. For old window tint that has baked on, a dedicated heat gun is more reliable.
Method 3: Ammonia and Black Trash Bag Method (For Stubborn Tint)
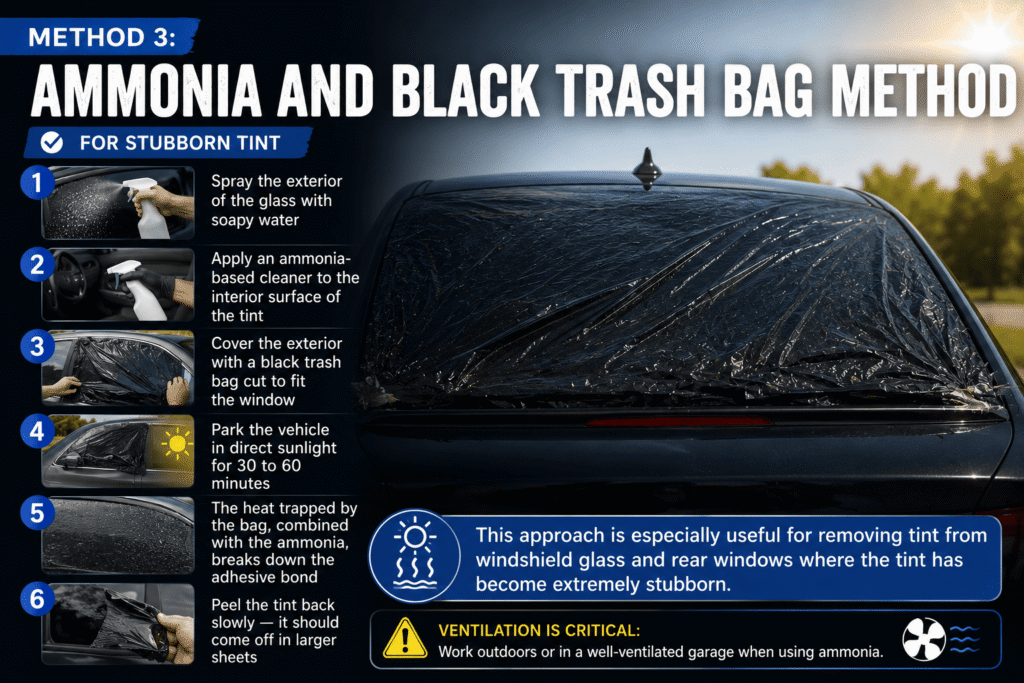
This method is particularly effective for removing old, brittle window tint that has been on a vehicle for many years.
- Spray the exterior of the glass with soapy water
- Apply an ammonia-based cleaner to the interior surface of the tint
- Cover the exterior with a black trash bag cut to fit the window
- Park the vehicle in direct sunlight for 30 to 60 minutes
- The heat trapped by the bag, combined with the ammonia, breaks down the adhesive bond
- Peel the tint back slowly — it should come off in larger sheets
This approach is especially useful for removing tint from windshield glass and rear windows where the tint has become extremely stubborn. Ventilation is critical: work outdoors or in a well-ventilated garage when using ammonia.
Also Read: Why Winter is the perfect Time for Window Tinting
Method 4: Soapy Water and Razor Blade Method
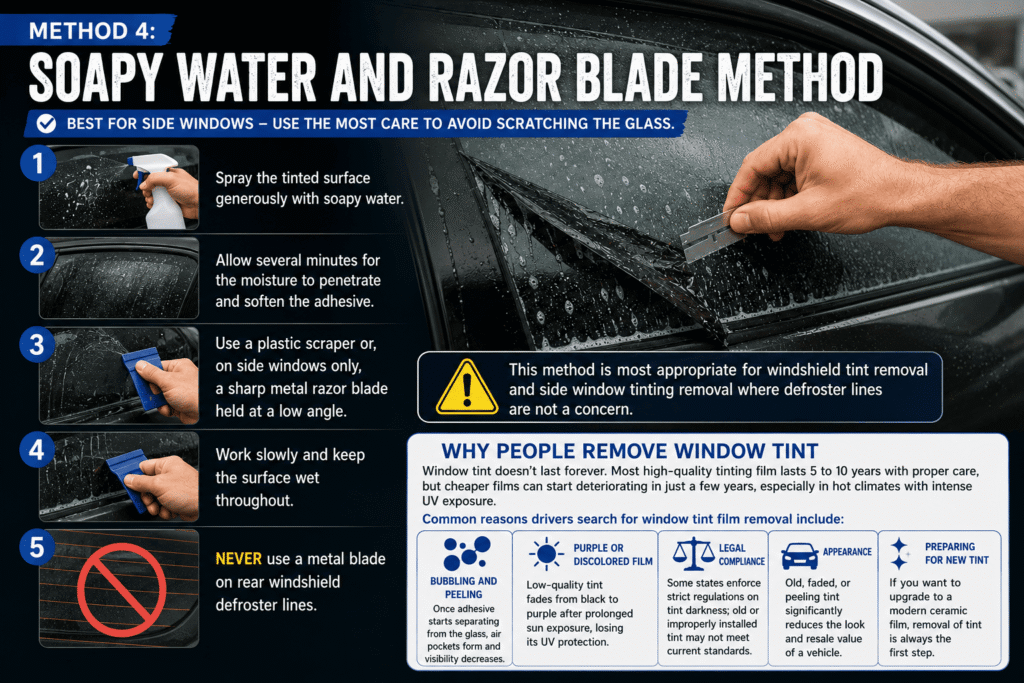
This method is best reserved for side windows. It requires the most care to avoid scratching the glass.
- Spray the tinted surface generously with soapy water
- Allow several minutes for the moisture to penetrate and soften the adhesive
- Use a plastic scraper or, on side windows only, a sharp metal razor blade held at a low angle
- Work slowly and keep the surface wet throughout
Never use a metal blade on rear windshield defroster lines. This method is most appropriate for windshield tint removal and side window tinting removal where defroster lines are not a concern.
Why People Remove Window Tint
Window tint doesn’t last forever. Most high-quality tinting film lasts 5 to 10 years with proper care, but cheaper films can start deteriorating in just a few years, especially in hot climates with intense UV exposure.
Common reasons drivers search for window tint film removal include:
- Bubbling and peeling once adhesive starts separating from the glass, air pockets form and visibility decreases
- Purple or discolored film low-quality tint fades from black to purple after prolonged sun exposure, losing its UV protection
- Legal compliance some states enforce strict regulations on tint darkness; old or improperly installed tint may not meet current standards
- Appearance old, faded, or peeling tint significantly reduces the look and resale value of a vehicle
- Preparing for new tint if you want to upgrade to a modern ceramic film, removal of tint is always the first step
How to Remove Tint Glue From Windows
Even after the film is removed, adhesive residue almost always remains stuck to the glass. This is one of the most common frustrations with DIY window film removal.
Why Adhesive Stays Behind
As tint ages, the top polyester film layer separates more easily from the adhesive, which has cured and bonded chemically to the glass surface. The older the tint, the more likely the adhesive is to stay behind even when the film itself peels cleanly.
Best Methods for Adhesive Removal
- Soapy water and plastic scraper spray generously, let soak for several minutes, then scrape gently at a low angle
- Goo Gone or WD-40 apply directly to the residue, let sit for a few minutes, then wipe away with a microfiber cloth; safe for side windows
- Adhesive remover spray commercial products designed for automotive glass work effectively without scratching
- 0000-grade fine steel wool with soapy water for stubborn residue on side glass only; move in small circular motions
For rear windows, always use a plastic scraper and adhesive remover. Avoid steel wool, abrasive pads, and metal blades anywhere near the defroster lines.
Post-Removal Glass Cleaning
Once all residue is removed, clean the glass thoroughly with a glass cleaner and microfiber cloth before installing new film. Any remaining contamination will affect how the new tint adheres and performs. Proper automotive glass care at this stage makes a real difference in how the replacement film lasts over time.
How to Remove Tint From Windows Without Heat

Some drivers ask whether it’s possible to remove window tint without a heat source. The short answer: yes, but it’s harder and riskier.
Without heat to soften the adhesive, you’re relying entirely on the soapy water method or chemical solvents to loosen the bond. This increases the chance of the film tearing into small pieces, leaving more adhesive residue on the glass, and requiring more aggressive scraping to clean up.
If heat tools are not available, the ammonia and trash bag method using direct sunlight is the closest effective alternative. The sun acts as a passive heat source, warming the glass and activating the ammonia to break down adhesive bonds without any electrical equipment.
Why Rear Window Tint Is Different (And More Difficult)
Side window tinting removal is relatively straightforward. The glass is flat, the adhesive is accessible, and if you make a small mistake, it’s annoying but rarely permanent.
Rear windows are different. The defroster grid, those thin conductive lines bonded directly onto the inside of the glass, runs under the tint film. Over time, heat from the sun bakes the adhesive into both the glass surface and the defroster lines themselves. When the old window tint becomes brittle or hardens, removing it becomes a delicate operation.
This is why searches like “how to remove rear window tint without damaging defroster” or “removing rear window tint with defroster” are so common and why this section of the guide exists.
What Usually Causes Damage
- Peeling too aggressively grabbing a corner and pulling hard can lift adhesive along with sections of the defroster strip
- Using a metal razor blade on rear glass a single pass can slice through a defroster line permanently
- Dry removal trying to remove film without softening the adhesive first increases resistance and dramatically raises the risk of tearing
Most rear window damage happens within the first five minutes of a rushed removal attempt.
Signs It Is Time to Remove Old Window Tint
Old tint rarely fails all at once. Here’s what to look for before beginning window film removal:
- Visible bubbles or air pockets forming under the film
- The film has turned from dark to a brownish-purple color
- Edges are lifting or peeling away from the glass
- Reduced visibility at night or in wet conditions due to haziness and glare distortion
- Streaking that won’t clean off
If your tint shows any of these signs, it has likely lost most of its UV protection and heat rejection capabilities. Removing it restores clarity and prepares your glass for a modern, higher-performing film.
Tools and Materials You Will Need
Before starting any DIY window tinting removal, gather these items:
- Steamer or heat gun (a hair dryer works in a pinch but is less consistent)
- Plastic scraper or plastic razor blade (safer than metal near defroster lines)
- Metal razor blade (for side windows only, never rear glass)
- Ammonia-based cleaner or commercial adhesive remover (Goo Gone, WD-40)
- Soapy water in a spray bottle
- Black trash bags (for the sun method)
- Microfiber cloths
- Protective gloves and safety glasses
Setting up in a well-ventilated area is essential, especially if you’re using ammonia. Work in a shaded spot or garage to prevent the cleaning solutions from drying too quickly on the glass.
Comparison of Window Tint Removal Methods
| Method | Best For | Speed | Safety | Notes |
| Steamer | Rear window / defroster areas | Medium | Highest | Best for fragile defroster lines |
| Heat Gun | Side windows, newer tint | Fast | High | Keep moving to avoid overheating |
| Ammonia + Trash Bag | Old, baked-on tint | Slow (setup) | Medium | Ventilate well; strong fumes |
| Soapy Water + Razor | Side windows only | Medium | Lower | Never use metal blade on rear glass |
DIY Window Tint Removal vs. Professional Service
Many drivers successfully complete DIY window tinting removal on side windows. The rear windshield is a different calculation.
| Situation | DIY Reasonable? | Professional Recommended? |
| Side windows only | Yes | Optional |
| Tint less than 3–4 years old | Yes | Optional |
| Old, brittle, or deeply bubbled tint | Risky | Yes |
| Rear windshield with defroster lines | Use caution | Strongly recommended |
| Luxury or specialty vehicles | Not recommended | Yes |
| Limited time or tools | No | Yes |
Cost of Professional Tint Removal
A common search query is “how much is it to remove window tint” or “tint removal near me prices.” Costs vary by region and vehicle type, but professional window tint removal typically runs $25 to $200, depending on the number of windows, the condition of the tint, and whether you’re also getting new film installed in the same visit.
Compare that cost against the risk of a damaged rear defroster grid, which can cost significantly more to repair. For old, baked-on tint, professional removal is often the more economical choice in the long run.
What Professionals Do Differently
Expert technicians use high-grade steamers, precision tools, and proprietary adhesive removers. Their experience with how adhesives behave after years of heat exposure allows them to apply the right technique for each vehicle. Shops that regularly install premium auto window tint film also understand how to prepare the glass so new film adheres correctly and performs as expected.
Frequently Asked Questions
Can you remove tint from a rear window defroster without damaging it?
Yes. The key is to avoid excessive force and aggressive scraping near the defroster strips. Use a steamer for even heat distribution, pull the film slowly and steadily, and use only a plastic scraper or your fingers near the defroster lines. Never use a metal razor blade on rear glass.
How do I remove old purple window tint?
Purple or discolored tint has aged significantly and the adhesive has usually cured hard. The ammonia and black trash bag method, combined with extended sun exposure, works well for breaking down the hardened adhesive. Be prepared for multiple passes and expect adhesive residue even after the film is removed.
How do I remove brittle window tint?
Brittle tint breaks apart easily rather than peeling in sheets. The best approach is to apply generous steam or heat to a small section, peel slowly, and re-apply heat frequently. Expect to work in small sections. Adhesive residue will likely remain and require a dedicated remover like Goo Gone after the film is off.
How do I remove tint from a windshield?
Windshield tint removal follows the same process as side windows. Use a heat gun or steamer, peel from a corner, and clean residue with an adhesive remover. Windshield glass does not have defroster lines, so the process is less delicate than rear window removal.
Will DIY tint removal void my warranty?
Most vehicle warranties do not specifically cover cosmetic modifications like window tinting. Removing tint generally does not void a warranty unless the process causes damage to the glass or defroster components. Check your warranty terms or consult a dealer if you’re uncertain.
The Bottom Line
Removing old window tint is manageable with the right tools, the right method, and patience. For side windows, a heat gun and plastic scraper are usually all you need. For rear windows, a steamer and careful technique protect the defroster lines that make this process more delicate.
If your tint is very old, brittle, or heavily bubbled, or if you’re working on the rear windshield of a vehicle you want to keep in top condition, professional removal is often the smarter investment. The cost of a damaged defroster grid is significantly higher than the cost of having the job done right the first time.
If you’re replacing the tint afterward, having removal and reinstallation handled together means you start fresh with film that performs the way modern tinting is supposed to: better heat rejection, actual UV protection, and a clean factory-quality finish. At JH Window Tinting, we handle both removal and installation, so your vehicle gets the quality finish it deserves.